It's December the 17th as I write this. After nine and a half years of doing the job I've edited my last ever edition of `Chanter' the quarterly journal of the Bagpipe Society. I have to say, when I first volunteered for doing it, I never imagined I'd be at it for so long. On the whole it's been a thoroughly rewarding time, but now it's passed on to the capable hands of Jane Moulder and I hope she enjoys doing it as much as I have...
Things are moving on with Estron as well - the girls are away at University (though they're home now for Christmas) and to fill the void we've acquired a new member for the band - Jess who's a bit of a whizz on the harp has been joining us for the last couple of practices. Of course when the girls are home we've got the full band, but now when they're away we can still do a creditable performance.
Meanwhile things have been fairly quiet on the instrument making front. I still have customers waiting patiently for the pipes they've ordered - and they will be getting them soon, though I'm not as quick at it as I used to be. Just finished this set of pibau cyrn for one customer - it's made from yew sourced in Carmarthenshire, plastic Eezydrone reeds in both the chanter and drone:
Also finished for another customer - Bill Reese in Virginia who plays with the Welsh / Breton folk group `Moch Pryderi' - another set of pibau cyrn, again in yew. This is Bill playing them during a concert:
In my last Blog post I showed you a set of Swedish pipes (sackpipa) I made for myself. It works at a lighter pressure than my pibau cyrn so I've been playing it quite a bit recently - trying to get to grips with the different fingering, and assembling a collection of tunes in it's peculiar scale from various internet sources.
I've also gone back to my first love - the Appalachian dulcimer. I made my first one in the early seventy's and a few months ago made another. This is a type known as the Tennessee Music Box and has a bigger sound than the more normal types, due to it's much larger soundbox.
One characteristic is that the bridge and nut are formed from tin, cut and bent to shape over iron nails. Frets are made from staples and are placed just under the melody string, while the tuners are simply screw in eyes which work much better than you might imagine.
I've not really been having a very good year so far. Ongoing health problems with my asthma, peaking a few months ago with an ambulance trip into A & E. But now I'm glad to say the medication I'm on seems to have stabilised it somewhat. Needless to say I've not exactly been very active with instrument making or performing with Estron, though we did have a gig at Fishguard Folk Festival which went very well, despite my breathing problems and that Danny managed to dislocate her thumb a couple of weeks before, doing so much damage in the process that she had to have her whole forearm and left hand in plaster - not the best thing for bagpiping really! She managed it though. About half our set she played with the top d thumb-hole taped over, and the other half she switched to trombone which really fitted in with the rest of us very well.
Since then we've also been doing quite a bit with Heb Enw Morris. For a long while I stuck to just playing for the team, and that on accordion, but since my switch in medication I've been dancing more as well.
Micky, me and Dan playing in Cardiff at our friend Phil Edwards' wedding to Linda - a real Morris do with us representing Heb Enw, and others from Cardiff Ladies, Full Moon and Clocs Canton. Linda dances and Phil plays for all three sides...
Outside the Iron Duke in Clunderwen, playing my French G pipes. These don't have a bass drone to make it easier for stuffing it in and out of the bag when playing Morris at events.
Heb Enw at Tafarn Sinc, Rosebush, with the other Pembrokeshire Morris team - Carreg Las.
So now I'm beginning to feel a bit better I've started to finish off some on-going projects to get me back in the swing of pipe-making so I can finish off the orders for pipes for customers who have been waiting a bit long now. First up was a set of pibau cyrn Danny started for herself a couple of years ago with me teaching her how to woodturn and in fact she did do about 90% of the woodturning. I finished the pipes off for her, doing the more difficult bits. The result is below - needless to say it's not for sale!
Dan's new pipes - the wood is ash and the chanter is fitted with a plastic Ezeedrone tenor highland drone reed.
She's also had a set of Swedish sackpipa for her 18th birthday. We got it for her from the Texas pipe-maker Seth Hamon who uses his own make of plastic reeds for the chanter and drone which really have a good reedy sound to them and stay in tune.
Actually I was so impressed with them that I ordered a spare set of reeds from Seth and made a set for myself, though I did without such modern additions such as the double hole for c and c# and the slider on the drone. I styled mine after the 19th century Mockfjard instrument.
Like the original it has a solid, one-piece drone and also plays only the traditional Swedish pipe scale which is A melodic minor, with A being the 3 finger note. So that's E F# G# A B c d e
Again, this isn't for sale. I'm currently attempting to learn to play them as they have very different fingering to what I'm used to, and the music is quite different too. Polskas and such like.
Next job is to finish off some of my customers instruments. And about time too...
A pibgorn is nothing without a good reed to make it work. In my last post I went through step by step how I go about making one of the `square' pattern pibgorns. In this one I'll cover making the reed and getting it to work.
The reed I'm going to make is made in one piece from a length of Arundo Donax - otherwise known as reed-cane. The stuff that's used for such things as saxophone and clarinet reeds as well as traditional bagpipe reeds. In fact I used to use tenor drone reeds from Highland bagpipes, shortened and with the tongue shaved thin. Some of them worked brilliantly, but others weren't so good. Then I got a box full of reed cane from a guy in Sardinia...
The first job is to select a piece with a nice round cross section so that it will fit into the pibgorn reed socket nicely. I'll be wrapping the open end of the reed with thread to make an airtight seal later on so it wants to be a loose fit in the pibgorn. Next the excess reed is cut off close above the leaf node using a junior hacksaw and taking care not to split bits off the reed. The node itself forms an air tight seal at the top end of the finished reed. Trim off any bits of leaf there.
Next, the reed needs to be cut to length. I measure it against an old reed to get the length right, then saw it through with the junior hacksaw - cutting in first from one side, then from the other. This minimises the risk of splitting bits of cane off which would ruin the reed. I trim round the open end with a knife then make sure there's nothing up inside the reed by slipping a twist drill bit that's a loose fit up inside it.
Then I use some fine sandpaper to roughen up the surface of the last 15mm or so at the open end. I'm going to wrap thread on this, so first I apply a bit of glue to further give the thread something to grip to. Then whip thread on until the reed makes an easy push fit into the reed socket of the pibgorn.
The picture above shows the pibgorn with the reed as it is at this stage. The next job to do is to cut the tongue out of the body of the reed. Make a sloping cut just below the node at the sealed end of the reed.
Then another in the opposite direction to make a notch out of the reed. Then make the first cut a bit deeper. Your knife needs to be really sharp so if you're using one that uses disposable blades, then fit a new blade before you start.
After this you're going to split down the sides of the reed to form the tongue. Start up near where you've just cut across the reed. You start the cut and by gently twisting the blade, force the reed to split along it's grain. If you were to actually cut down the length, it wouldn't be possible to get a clean split and the reed would be unlikely to work. Split both sides, right down to the thread binding at the open end of the reed.
I find the reeds work best if you then shave the tongue so that it ends up about 1mm or a bit less thick.
When the tongue is about the right thickness you need to tie on a bridle. For this I again use thread, but it's not stuck in place so you can slide it up or down the reed to vary the length of the tongue.
At this stage the tongue will be clamped shut against the reed body, but to work it needs to be open at the tip near the node. Round about 1mm should work. You could of course simply bend the tongue up and it would work but the tongue would all the while be trying to return to it's natural state so the instrument would not stay in tune at all. To prise the tongue up I insert a length of hair from a horses tail under the tongue up near the bridle. This locks the tongue in the open position.
The reed should now look like the pictures below:
It's now time to see if it works at all. The picture below shows me testing the reed against an electronic tuner. I've put the open end in my mouth and am sucking hard on it to make it sound. From experience I know that to work in the pibgorn it needs to sound about F# above the top D of the pibgorn. This one was more like G# so I adjusted it to bring it down to F#.
I did this by moving the bridle a little down towards the open end and also moved the hair down a bit too. This didn't flatten it enough so I gently scraped the reed thinner above the hair. Generally, scraping it here flattens the reed, whereas if you made the tip thinner it would sharpen it. Shaving the whole tongue evenly along it's length makes it easier to play, but shouldn't alter it's pitch. It was now time to try it in the pibgorn.
I found the pibgorn played well and without too much pressure but it generally played way too sharp over it's whole scale. To lower it, I pulled the reed up in it's socket and when this didn't lower it enough I flatten it by applying a blob of melted wax to the tip of the tongue using a bradawl heated in a candle flame. The wax I applied was from a beeswax candle - beeswax is quite sticky and stays stuck where you put it.
At this point it's best to leave it until the next day before continuing. Making the reed entails quite a lot of messing with the tongue and it needs to settle down before you continue otherwise you could have the pibgorn playing nicely and in tune and the next day it might not even play at all, or be way out of tune.
So the next day I returned to it and when I tried it I found it played well and pretty much in tune. A few of the notes - E, F#, G and B - played flat but not too much so I slightly enlarged the holes using the pillar drill until they were in tune. If a note had been too sharp, but the rest ok, I could have flattened it by running a little melted beeswax round the bore of the hole with the bradawl. It's quite normal with a much played instrument to see quantities of wax in the holes!
So that's it. This reed was actually quite easy to make and get working. Sometimes it can take ages of messing about to get a reed working and sometimes you have to bin it and start again with a new piece of cane. One of the joys of pibgorn ownership!
Below is a Youtube video of the finished instrument:
This instrument is currently for sale at £165 plus postage. SOLD.
This is how I go about making a pibgorn. The one shown here is made of locally sourced yew and is of the `square' type like one of the examples in the Museum of Folk Life at St. Ffagans, just outside of Cardiff. The finished instrument will be in D, giving a single octave with C natural or C# available before the top d.
Starting point is a blank cut from some seasoned yew. This is a little bigger than the finished instrument. Using a twist drill bit (8mm) on the lathe I drill in from both ends so that it meets perfectly in the centre of the blank. This will be the bore of the finished instrument but at this stage it also helps prevent cracking during final seasoning. The ends are sealed by dipping them in melted wax before the blank is hung up inside my home so that it's moisture content can reduce to that inside the house. This takes about a month and is very important for producing a stable instrument.
After final seasoning the blank is mounted on the lathe and the ends squared off to the finished size. Then using a parting tool, tenons are turned on each end that will fit inside sockets drilled in the bell and mouth horns. If I was making a `round' pibgorn I would have rounded off the blank before making the tenons as otherwise there is a danger of the tenons cracking under the strain.
The body is now shaped. I do it freehand using a grinding disc mounted on the lathe headstock. Although I'm using a machine to do the shaping, the finished shape is much more hand-made.
Instead of being perfectly flat, I make mine so that the centre of the body is thinner than the two ends. The grinding leaves quite a lot of scratching on the surface so I finish it off by hand sanding it smooth. At this stage I then bind the tenons with polyester sewing thread so that they will be a perfect fit in the horns.
At this point I make the depressions in which the finger and thumb holes will sit. I have a jig I use for marking the hole positions so I use this to help me get the depressions in the right place. After marking them out, I cut along their edges using a junior hacksaw to the required depth, then trim away as much wood as I can with a Stanley knife before removing the rest with a file.
The body at this stage when all the depressions have been filed out is as shown below. After this, I like to oil the piece by soaking it in a mixture of boiled linseed oil and real turpentine which I've previously heated to about 100 degrees c. The heat causes the air in the wood fibres to expand and bubble out and as the oil cools it is sucked back into the wood. This helps to moisture proof the finished instrument so it remains stable during playing.
Afterwards the pibgorn body is hung up to let the oil drain off it before wiping it dry, including down the bore, and then hanging it back up in the house for the oil to dry. This takes a few weeks. Basically as the more volatile oils evaporate, the rest turns into a kind of water-repellant jelly inside the fibres of the wood.
While it's drying I make the horns. After selecting a suitable one for the bell-horn, I cut off the tip at the point where the internal cavity ends, after first measuring this by poking a wire down inside. Then I drill a pilot hole in the sawn-off end, hand holding the horn against a drill mounted on the lathe. I don't recomend this as it's a good way to lose some fingers!
The socket is then drilled, in the same manner but using a flat bit modified so that it follows the pilot hole and uses the pilot hole to centre it and stop it wandering. After this I clamp it upright as best I can and saw out the open `jaw' shape characteristic of Welsh hornpipes.
The horn is then ground thinner using the grinding wheel on the lathe again and finishing off with a fine sanding disc. Horns vary in their wall thickness but they need to be quite thin to give the best sound. I personally don't like them too thin as it leaves them prone to easy breakage, but if they are too thick the balance of the finished instrument will be all wrong.
Needless to say - don't breathe any of this stuff in! The mouth-horn is similarly made. It's a bit easier than the bell-horn as there's no jaw shape to cut out, but you also have the problem of making the open end round when the horns come in every shape but. When they're both finished they need to be soaked in a tub of water for a few weeks to soften them. After this they're taken out and finished by scraping and the bell-horn has serrations cut into the open end with a Stanley knife.
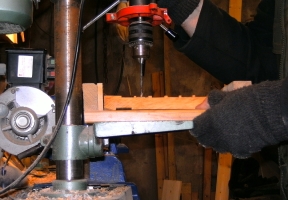
While they horns are still in soak, I drill the fingerholes when the oil has dried. Again I use the jog to mark their positions and drill them using twist drill bits in a pillar drill. This innevitably causes splinters in the bore which I remove using a metal skewer heated to red heat with a blowtorch, which with care I can use to burn the splinters without damaging the bore. Crude but effective.
After this I drill the reed socket in the upper end of the pibgorn, polish the horns using beeswax polish, and that's the easy bit finished. The hard bit of course is getting it to work! And play in tune! This involves making a reed and by tiny adjustments getting it to play more or less properly before adjusting the fingerholes to bring them in to tune. I'll deal with that in another post.
Well here we are, allegedly it's Spring, the days are getting way longer and we've been enjoying a couple of weeks of mostly sunshine but it's still freezing cold... I'd like to report that I'm doing all sorts of bagpipey things but sadly I haven't been doing much at all - pipe making has ground to a halt entirely and I'm finding playing to be really draining. It's been coming on for months but now I have a diagnosis - asthma, brought on probably by an allergy to something. As I'm handling hay a lot of the time here on the farm it's got to be the prime suspect, so I don't know how this is all going to work out. Can't escape the hay, can't do much with mouthblown pipes if you can't blow.
But it's not all doom and gloom. I've been playing a bit with Estron - at New Year we had a bit of a sesh in tafarn Sinc, Rosebush, back when my breathing wasn't so bad.
Saint David's Day I was playing bacbib with Pibau Planed in the big parade in Cardiff which went really well. Peni Ediker on D Gallician Gaita and Stef and Henry on drums.
And on International Bagpipe Day, March 10th, which is organised largely by The Bagpipe Society, we (Estron again) played during the service at Llanwinio church which is a few miles east of here...
Last weekend we were booked to do a Ceilidh in the Stackpole Centre in South Pembs., for a `meditation weekend'. We did actually wonder what sort of meditation weekend has a ceilidh in it, but as it turned out it was a really good do with up to sixty people dancing and really keen to dance as well. About two thirds of them were British Asians who had never come across this sort of thing before but they seemed to have a whale of a time.
Next gig for Estron is in Narberth for an event organised for `Help for Heroes', 27th April, followed by Friday 24th May at Fishgurd Folk Festival. Hopefully my asthma drugs will be doing some good by then otherwise I'm going to have to switch to bellows pipes...